ITS Videos and Quick Guides
Adding/Editing Students Quick Guides
Adding and Importing Student Profiles

- Before adding new students, you must create a new Student Group. Student Groups are custom tags used as secondary filters for reporting and scheduling.
- To create a new Student Group, click New Group in the right corner of the Browse by Group table. Enter a name that fits your program and click Save.
- Once your Student Group is created, you can add students individually or in bulk.
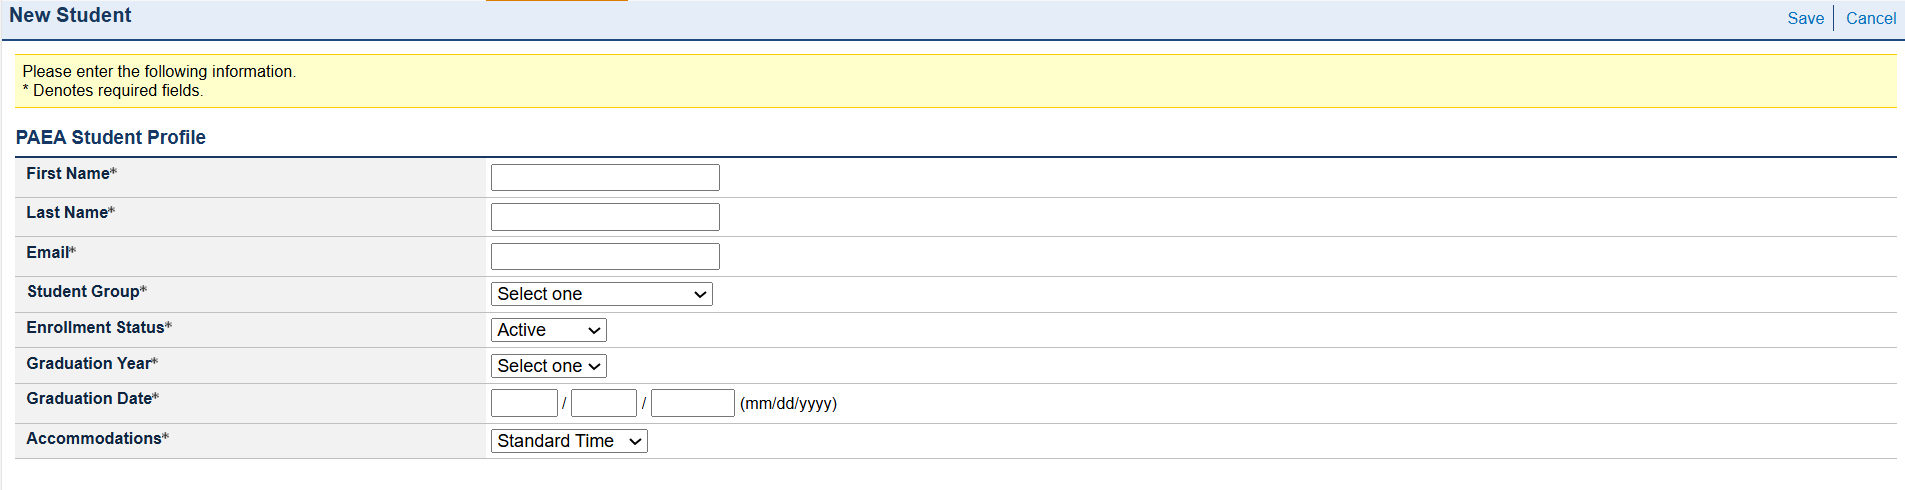
- To add them individually, click New in the top-right corner of the Students page. This opens a form to enter the required information.
- The table on this page provides a brief overview of each field’s requirements. Full details are also available in the User Guide and the Adding Students one-page reference document.
- Enter the student’s information and click Save in the upper right corner.
- To import students in bulk, click Import in the top-right corner of the Students page. In the Import Selection section, download the template, open the file, and enter all required information.
Additional field requirements are outlined in the User Guide.
- When the spreadsheet is complete, go to File, select Save As, and confirm the file type is CSV, not XLS or another spreadsheet format.
- Return to the webpage, click Choose File, select your CSV file, and click Import.
- The Import Status section shows the progress of your upload. Successful imports display a green check mark in the Indicator column.
- If there is an issue, the Indicator column will show a red X, along with an Error link in the Status and Import History sections. Click the Error link to view details, including the location of the file and instructions for correction.
- Fix the errors in your CSV file, save the changes, and repeat the import steps. No student records are uploaded until the import completes successfully.
Searching and Editing Student Profiles
- The Students page provides several ways to search and browse student records. The default All Students tab lets you search by name, or browse by graduation year, last name, or Student Group.
- The Advanced Search tab allows you to search using multiple criteria or filter by other profile information, such as graduation date and enrollment status.
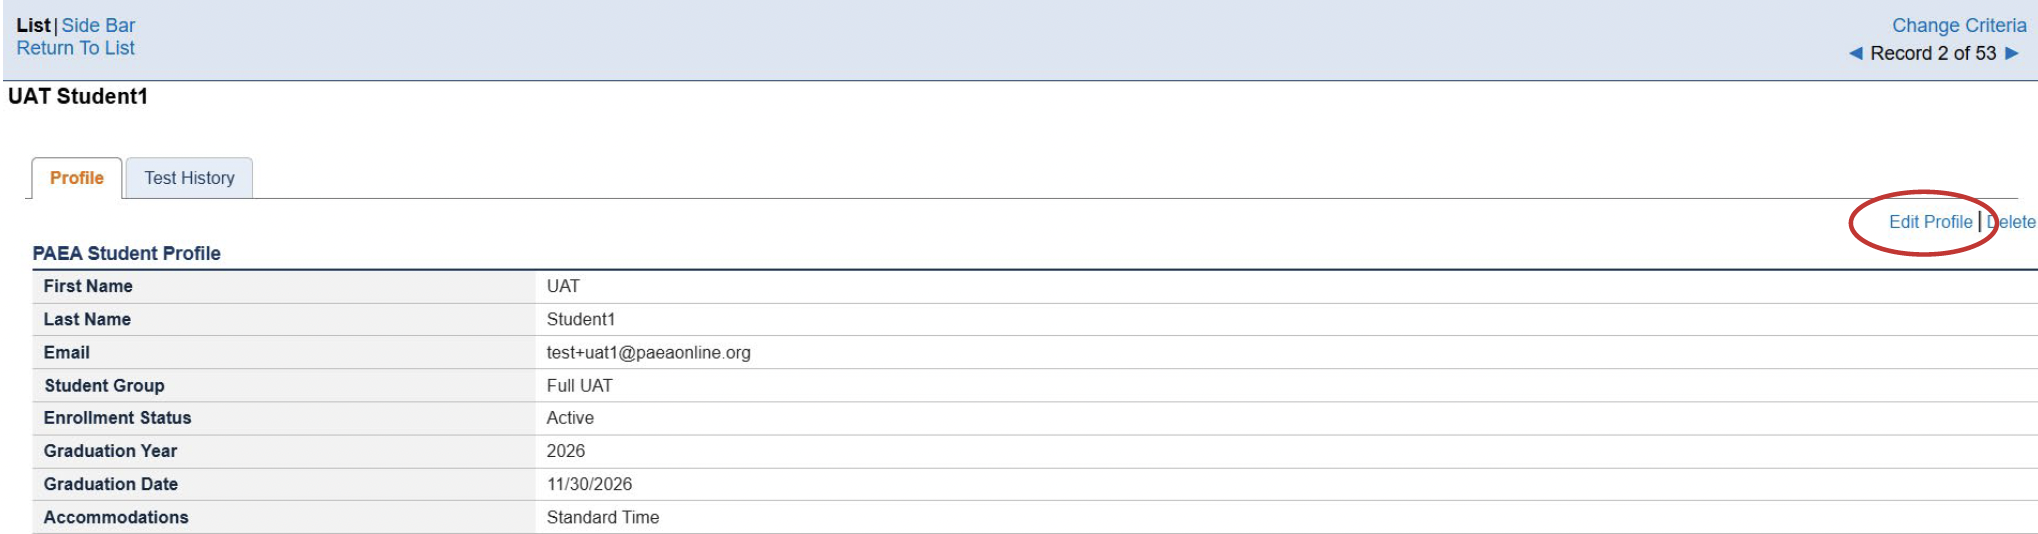
- Once you find the correct student, select the CandidateID link to open their account details.
Student accounts can be edited individually or in bulk.
- To make individual updates, find a student and open their account details. Select Edit Profile, make your changes, and click Save. Email address changes must be made using this method. Bulk editing does not support email updates.
- You can delete a student account by using the Delete option, as long as the student has not been scheduled for or completed any exams.
- Bulk updates are completed by using the Import feature with a CSV file. As long as the email address remains the same, other changes in the import template will update the student’s information in the Assessment Hub, including names, graduation dates, and student groups.
Student Exam Boxes
Scheduling and Managing Exams
Scheduling and Managing Exams Quick Guide
Please note: Students using time-based accommodations do not require separate exam events.
Separate exam events are required when:
- In-Person exams have different start times
- Exams require Additional Instructions in their email, and
- In-Person exams take place in different locations with different proctors

- To schedule a new exam, select Scheduling from the toolbar and click New in the top right corner. Enter the exam details and click save. Remember that any Additional Instructions entered here will be emailed to students added in the next step.
- After saving, click Add Students at the top of the Students section on the next screen. You can browse all students, search specific students by name, and search based on student profile criteria such as graduation date and Student Group. Select the students to include and click Add Selected Students. Each student will immediately receive a confirmation email.

- To edit an existing exam event, select the Test name from the Scheduled Tests table on the Scheduling page.
- In the top-right corner, choose Edit or Delete. An event can only be deleted if no scheduled students have started the exam. Editing allows you to change the time zone, test date and time, and Additional Instructions.

- To add students to an existing exam, select Add Students in the Students section. To remove students, click the three dots in their Actions column and select Remove. Students who have started the exam cannot be removed.
- For scheduled Unproctored or Remote Proctored exams, the Students section is also where programs obtain the registration codes required for exam launch.
- Students scheduled for Unproctored exams receive their registration code in their confirmation email.
- For Remote Proctored exams, programs must provide the registration codes to their third-party remote proctoring service.
- To obtain the codes for the remote proctoring service, click Download Codes on the right side of the Students section. A spreadsheet with that information will download automatically.
- The Resend Email link at the top of the Students section will resend the schedule confirmation to all students on the event. You may also use the Actions dropdown to resend emails individually.

- The Status column within the Students section allows Assessment Hub users to view whether exams of all delivery types are Not Started, In Progress, or Completed, along with the time of completion.
Introducing GradEOR
PAEA is pleased to announce GradEOR, a new tool that allows programs to convert three-digit scaled scores from PAEA End of Rotation exams to traditional two-digit scores for use in gradebooks.
Watch the video demonstrating how to use GradEOR, and view GradEOR FAQs below.
Purchasing & Ordering Exams
Ordering exams has never been easier! A great feature in the Assessment Center is the option to upload your purchase order (PO) online. Doing so removes the requirement to email PAEA a copy of your purchase order, as was the normal procedure when ExamDriver was in use. The PO can be uploaded in one of three different areas while navigating through the Shop:
- When entering your payment information, just before clicking the button to Place Order.
- On the confirmation page, immediately after the exam order is placed.
- When viewing previously submitted orders. From the Shop home page click View Previous Orders, then View Details for the relevant order.
- This option is great for programs whose policies require submitting the exam order first, then providing an invoice to their finance department to receive a purchase order and payment.
In each area the button will be labeled “Upload Files”. Once a PO is uploaded into the Shop with an exam order, PAEA Finance receives an automated notification to review the information for accuracy and subsequently release the exams to your program. Keep in mind the Finance review process and releasing of exams may take two business days following the PO upload, and the PO only needs to be uploaded in one of the three places. Although emailing the PO is no longer required, you may still send a copy to exams@paeaonline.org for assistance if there is an issue uploading it online, or if the exams need to be urgently released.
For reference, uploading a PO is detailed starting on page 8 of the Assessment Center User Guide, which is available to download on the Assessment Center Resources page. We also have an instructional video available HERE outlining the complete ordering process from start to finish.
A quote can be generated in the Shop by program users with Ordering Agent assessment permissions.
- Log into the PAEA Member Community, select the Assessment Center tab, then clickAssessment Shop.
- From the next page click Order Exams or scroll down further and click the button for the exam you need to order.
- Adjust your quantity and click Add to Cart. Next, choose to Continue Shopping or View Cart if you have all the exams needed.
- On the next page to the right, click Next under Request a Quote – Exams.
- Review the order for accuracy, click Next again, and a .pdf file will be generated with your quote information.
Note: A quote is not an invoice and does not represent an order submission. After obtaining the quote, please return to your cart and finish submitting the order until a confirmation message is received.
Invoices are generated in the Assessment Shop after an exam order is submitted. There are several ways you can access an order invoice for completion of payment.
- You can download an invoice after your order is placed by clicking ‘View PDF’ on the confirmation page at the end of the process.
- You can also access this PDF by clicking the link in your order confirmation email.
- You can download an invoice at a later date by viewing your order history. Begin by logging into the Member Community. Click the Assessment Center in the navigation bar to enter the Assessment Shop. Near the lower half of the shop’s home page is the “View Previous Orders” button, which will take you to a list of your program’s orders. Locate the order you need and click ‘View Details’. On the next screen you can click ‘View PDF’ to generate the invoice.
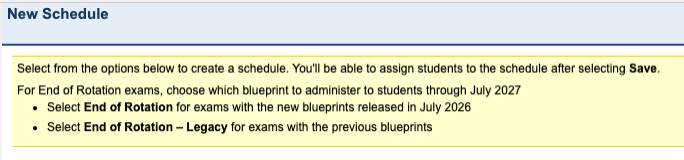
Scheduling Exams
PAEA continues to prepare for the release of updated End of Rotation exams aligned with the new blueprints. Beginning July 27, 2026, programs will be able to schedule students for the exams on the new blueprints.
Programs with clinical cohorts currently testing on the current blueprint may continue administering those exams through July 2027. At the time of scheduling, you will simply select the appropriate exam version.
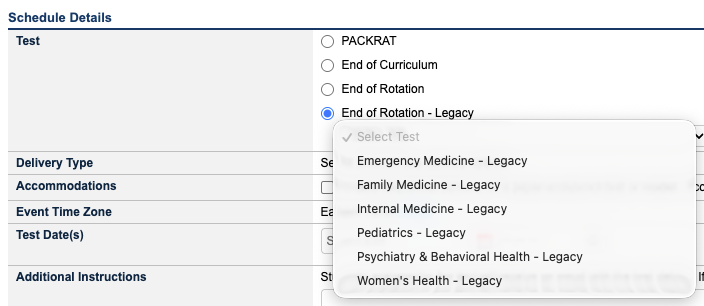
The first scheduling dropdown will include two End of Rotation options with instructions to help you choose the correct dropdown:
- End of Rotation for exams using the new blueprints. The Surgery End of Rotation exam will appear in this dropdown, as it transitioned to the new blueprint structure first.
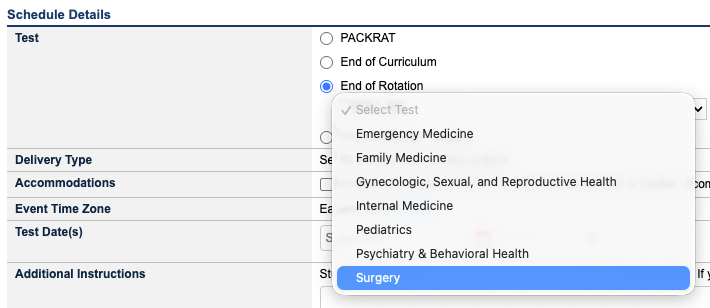
- End of Rotation – Legacy for exams using the current blueprints, which will remain available through July 2027. Surgery is not included in the Legacy dropdown. You will also see (Legacy) added to score reports for these exams beginning on July 24 in preparation for the transition.
The new exam versions will be available to all programs beginning July 27 for scheduling and administration. There is no need to order different credits or opt in to the new exams.
Statistics for exams on the new blueprint are now available on the PAEA website alongside the statistics for the current blueprint versions.
PAEA has three options for exam delivery:
- In-Person exams are scheduled for a set time, with in-person faculty or staff actively proctoring in the testing space. These exams may be scheduled until the time they are set to begin. Secure Browser is required for these exams. Students log in with the Proctoring Session provided by the proctor on test day, and their Last Name and Email.
- Unproctored exams are taken remotely without a live proctor present, and administered in Secure Browser. These exams have a start time and end time that may be on different days to allow for flexibility of when the student takes the exam. Students log in with a Registration Code sent in their exam confirmation email and their last name.
- Remote Proctored exams are are scheduled for a date range with a Registration Code provided to the student by the proctor. They are taken off campus with a third-party remote proctoring service, or proctored by faculty or staff using video conferencing to monitor exams (Zoom, Teams).
- Requirements Using Third-Party Monitoring Service: Third-party monitoring service using their screen share and lockdown tools is most ideal
- Secure Browser is not required
- Requirements Using Faculty or Staff to Remote Proctor:
- For remote proctoring by faculty, programs can decide between two options for connecting with the student to monitor behavior:
- Use their web camera and screen sharing — Secure Browser cannot be used
- Use a second device (phone or iPad) to the side of their work station to monitor their environment, including a view of their screen — Secure Browser is recommended via the In Person delivery type
- For remote proctoring by faculty, programs can decide between two options for connecting with the student to monitor behavior:
- Requirements Using Third-Party Monitoring Service: Third-party monitoring service using their screen share and lockdown tools is most ideal
In the Assessment Center, time-based accommodations are indicated on students’ profile. During the student upload process, accommodations should be indicated in the CSV file using 1 for Standard Time, 1.5 for Time-and-a-Half, and 2 for Double Time in the relevant column.
Faculty will need to review their students with time-based accommodations in the Assessment Hub under Students to make sure time-based accommodations are assigned correctly in their profile.
In the Assessment Center you can schedule students’ exams to begin in their local time zones. This includes the ability to schedule in separate events if you have students taking remote exams in different time zones. The Scheduling page will default to the time zone of the program’s physical address, but you can change the time zone where the student will take the exam at time of scheduling. The student’s confirmation email will state the time zone where the student will sit for the exam.
You may need to edit an exam when a student is unable to take their exam on the scheduled day, or if there was an issue with the details discovered before they began their exam.
However, if the student is unable to take their on the scheduled calendar date (In-Person) or within the scheduled date range (Unproctored and Remote Proctored), you can edit the exam event after being informed of the delay. This can be done by any faculty or staff with Assessment Hub User permissions by going to Assessment Center > Assessment Hub > Scheduling. To change the date or time, select the desired exam event and Edit.
Editing the start date will impact any in-progress exams, so make sure students who take the exam as scheduled are finished for the day.
After the test date or range, you have three days to edit the exam details from the Scheduling > Show Past 90 Days screen. After that, the system will automatically cancel the event and return unused credit to the program’s balance.
Assessment Hub Users can also edit an exam until the student sees the Welcome screen on test day. Contact exams@PAEAonline.org if you need assistance after a student has reached this stage.
NOTE: If the student is simply delayed in starting their In Person exam, they may still begin the exam any time on the scheduled test day, up until 11:59 PM in the designated time zone.
If you need to cancel an exam but do not know when it will be rescheduled, you can do so from the Scheduling page. To cancel, remove the individual student or Delete the entire event. When the exam is cancelled on this page, the exam credit is returned to the program’s available balance for future use.
Three days after the test date or range, the system will automatically cancel unsat exams and return unused credit to the program’s balance.
Assessment Hub Users can cancel an exam until the student sees the Welcome screen on test day. Contact exams@PAEAonline.org if you need assistance after a student has reached this stage.
Student Accounts and Passwords
As you’re uploading the students in your latest cohort, here are some recommendations for making it easy to get the responses you need to help students successfully activate the password-protected access they’ll need while in your program.
Students will not need to set their Assessment Hub passwords until their first score report is released. Their first email will be a scheduling confirmation message for their first exam, which includes instructions for setting up their device for test day.
Their score report notification email will include instructions for establishing their password, and it is entirely self-serve:
- Navigate to assessmenthub.paeaonline.org
- Select First-Time Login
- Enter their email
- They will be sent an email with a link to set their password. That password must contain at least:
- Eight characters
- One capital letter
- One lowercase letter
- One number
- One special character
- Agree to the Student Terms of Use
In the event a student’s password creation link expires, students simply need to repeat these instructions. PAEA also has resources for communicating with students about the Assessment Hub, including templates about the message flow, on the Student Resources page.
- Student Group Mismatch: The Student Group entered in column D of your CSV must match the student group name created in the Hub. This includes spacing, capitalization, and punctuation.
- Blank Spaces: The program should ensure when copying and pasting information that the student’s email address does have an extra blank space at the end of the email address. You will be able to upload these extra spaces, but students will not receive emails as expected.
- Accommodations: You must enter numbers in Column G as follows – 1 for Standard Time, 1.5 for Time-and-a-Half, and 2 for Double Time. Other numbers will not be accepted.
Information for previously uploaded students can be updated from the Students page in the Hub.
- Search for the student(s) you wish to edit
- Select the number in the CandidateID column
- Select Edit and update information as needed
- Select Save
NOTES:
- Student profiles cannot be deleted. If a student leaves the program, faculty or staff should update the student’s Enrollment Status to Inactive. This will immediately close their account.
- The Graduated state will be set automatically when on the student’s graduation date. This will remove them from the Scheduling module and allow them to access their accounts for 120 days after the established graduation date.
Scoring and Reports
The Program Composite Reports tab is where programs release the student scores following an exam event.
- Go to Score Reports and select Composite Report, then use the dropdown menus to filter to the necessary exam and select Generate Report
- Check the box next to the students whose scores you want to release and select Release Scores
- If you are releasing the scores for all the students that took the exam, select the box in the header of the checkbox column and select Release Scores
- Students will receive an email that they have new score reports available in the Assessment Hub.
Note: If a student’s results for that exam have already been released, there will be a green check in the Released column. If you click the Release All Scores, it will not notify students again if their scores have already been released.
Historical Statistics
PACKRAT® Historical Statistics
Download PDFEnd of Rotation™ Historical Statistics
Download PDFEnd of Curriculum™ Historical Statistics
Download PDFFrequently Asked Questions
Scheduling Exams
Yes, they will receive an email confirming exam cancellation or modification.
Yes, you should create a different session for each room or location.
You can schedule two EORs for the same day as long as the time does not overlap (for example, tests taken at 8:00 a.m. and 1:00 p.m. will be fine). You cannot schedule two of the same exam on the same day, so if the student is taking two Family Medicine exams, the second will have to be scheduled after the first is completed.
Yes, the session number must be entered as formatted on the screen, XXXX-XX.
Yes. Students testing in the same room will use the same session number. If students with accommodations start at a different test time than the rest of the cohort, but in the same room, explicit instruction in the confirmation email needs to be provided to ensure students show up at the right time. Ideally, students with accommodations would be set up in a different location with a different start time and session number; however PAEA acknowledges that this is not always possible.
You do not need to schedule separately if they are taking the same exam at the same start time. However, you should create separate proctoring sessions on the Proctoring page if they are testing in different rooms.
1.0, 1.5, and 2.0
Student Accounts & Passwords
Programs will be able to upload both a cohort and individual students. However, if there are any errors in the cohort import file, students will not be added until the errors are corrected.
Exams can be scheduled as far in advance as you’d like, and up until the start time of the exam. Students will receive email reminders 7 days and 1 day before their exam, and for Unproctored and Remote Proctored exams, 7 days, 3 days, and 1 day before the end of their testing window.
Scoring
No, it is only avaialble as CSV to allow for flexibility across software solutions.
Students will receive their score reports after they are released to them by faculty. Students will also have access to score reports that were released to them in the current Assessment Hub on launch day.
GradEOR
GradEOR is available on the Assessment Center page of the Assessment Hub.
No, only the current faculty/staff user will see the inputs and outputs of the GradEOR app.
Programs should use their own scale points based on their program’s policies and expectations of students. Default values are present in the app, but these are simply placeholders.
The app is currently setup to handle one EOR exam at a time. Depending on the EOR exam you are converting, you can set the grade points appropriate to that exam at your program.
If your grading scale is pass/fail, then you likely will not have a need for the GradEOR app, as any score above the line is a pass and any below is a fail.
At this time, they will not save and we recommend documenting these values externally. Future enhancements may allow for storing such values.
The scale-to-raw score tables will no longer be produced for EOR forms. EOR scores have been reported as scale scores, rather than raw scores, since 2018. The new app allows for the conversion of the 300-500 score scale to a 0-100 score scale, while maintaining the equating done during the scaling process.
If programs have established relationships between the 300-500 score scale and a 0-100 scale they are welcome to use those values in the app.
The mean and standard deviations shown in the app are based on the same national data displayed in the Assessment Hub. Each EOR exam has its own mean and standard deviation and can be used to help determine the relationship programs use between the 300-500 scale and the 0-100 scale.
That is correct, in the current setup you must download the composite report and upload it to the GradEOR app. The potential to use the app more directly is the focus of future work.
The converted grades are calculated using a piecewise linear regression between each scale point you provide. A z-score method can be used to determine the scale points used in the app.
Consistent with the current and past iterations of the Assessment Hub, only the 300-500 scale scores are releasable through the Hub.
Publications

Assessment Insights
A qualitative analysis of students’ end of supervised clinical practice experience and their requirements.